Friday, May 1, 2015

EVERYDAY GOODNESS


I am back again this week with things from around the web that I find cute, interesting and inspiring. I'm hoping they inspire you!

LITTLE GREEN NOTEBOOK was the first blog I ever read. I received my own Macbook for Christmas in 2006 and proceeded to spend a good portion of the holiday's reading Jenny's blog. This week she shared images from a baby shower, she threw, that inspired me for several events I am working on decor for, that already have the same color theme.


Isn't it lovely!

I am so enamored by JOEL PLASKETT. I actually missed a good portion of a Tom Petty concert a few years ago because I was sitting close to Joel. I was distracted the whole time, wondering what his opinion of the show was and if he fanned out like everyone else at concerts.

Some people may believe it was because he was a hockey and basketball player that made me fall for my husband. Truth be told, it was seeing him play the guitar for the first time, at a house party, that sealed the dating deal for me!

I digress back to Joel, his new CD does not disappoint. I worked away to it all week. As of today, the title track is my favorite song, tomorrow I'll surely have a new favorite. I cannot wait to see him again, for the millionth time, in June!


Mother's Day is fast approaching. I'm sure you all have been racking your brains trying to figure out some good gift ideas. The malls will surely be busy this weekend!  

Here are some gift ideas for Mom. Be sure they go along with an unlimited supply of hugs and kisses, of course!!!


A LOVELY PIECE OF CUSTOM JEWELRY WOULD SURELY BRING A SMILE


This week I made some cute name tags for my women's group annual meeting.


My son helped me make a cute video tutorial of how to make these fabric roses. Take a peak!


One last note, I thought I would share with you SHELLEY'S latest post. Some of you might read this as being insensitive or unkind but I see it as choosing to be grateful, for all you have and encouraging others in difficult situations to do the same. A lesson we all need to be reminded of from time to time!


Have a great weekend folks! Thanks so much for all your comments and encouragement here and on social media. It means the world to me! It inspires me to continue to share, knowing that so many of you guys are reading along!

Warm Regards,
Valerie


SHARE:

Wednesday, April 29, 2015

HOW TO FRAME YOUR WALL MOUNTED TV

If you are like me, TVs are not necessarily a part of home decorating that excites you. Although we have come a long way from the days of the ginormous bubble screened boob tube and the floor model big screens, concealing a TV to make it a part of the architectural detail already found in your room is a good idea to me. I have already shown you two attempts I have made to do just that in my own home, firstly over the fireplace in our FAMILY ROOM and again in the children's GAMING ROOM.

Family room
Gaming room
If this is something you might like to do in your own home I'm pretty sure anyone with basic carpentry skills, time and patience can do it too. 

First things first, you must hang the wall mount, you have for your TV, in the location you want it. It always looks much better to run the cord(s) through the wall to an electrical outlet further down or into a proper device and make sure installation is up to code.

Here you can see the latte through the hole cut for our cords.

Supplies you'll need:

  • Mitre saw
  • Table saw 
  • Level
  • Drill with large hole cutting bit
  • Air compressor 
  • Nail gun
  • Square
  • Stud finder
  • Measuring tape
  • Wood filler
  • Caulking
  • Front moulding according to your circumference measurements
  • Plain boards for sides around the 

To make a frame for the TV, you need to measure the perimeter of your TV, make a visit to your local hardware store and shop for some decorative moulding for the front and flat boards for the sides. You could do this with crown moulding however our TV is on a swivel mount and, consequently, it is already off the wall quite a bit, so I went with a wide flat moulding. This, I felt, coordinated well with the other wood details of the space. 

Once you have everything picked out, measure the depth of your TV from the wall and cut your pieces for the sides and top. Keep in mind, the thickness of your decorative moulding to ensure the frame front stays flush with your TV.  Run your plain boards on your table saw to get your desired width. If you are organized and this is a step you would like to avoid, you could ask at your hardware store and they would likely do this for you, for a small fee.

We used 5/8" MDF for the frame. We designed the frame to leave a 1/2" extra around the perimeter of the TV, to give it some breathing room and to accommodate the ability to tilt it to different angles for your viewing pleasure! I would also like to point out that you should construct the frame by overlapping the side pieces with the top and bottom pieces, as this will eliminate seeing side seams. Nail into place using 1 1/2" nails. 

I apologize for the messy pictures to follow but sometimes when you are on a roll there is no time for clean up. It always gets worse before it gets better!

Step One
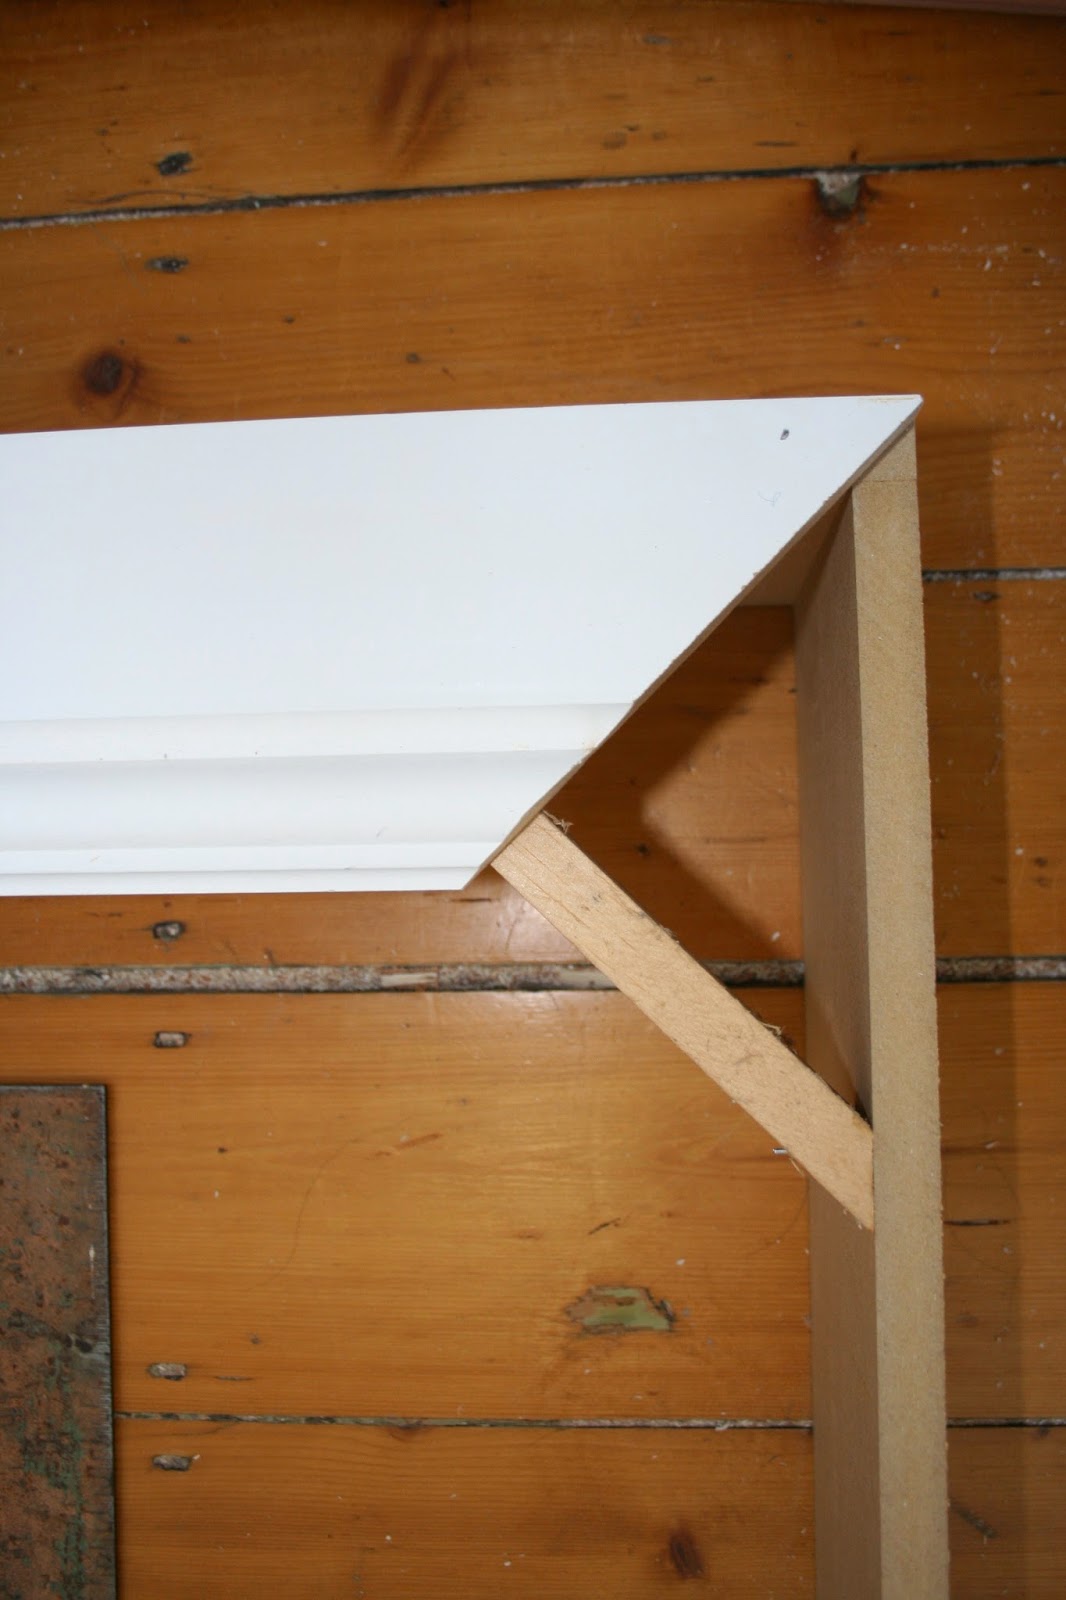
The next step is to cut some corner braces to help provide support for your frame. You want these  braces to be long enough to give maximum support, but not so long that they will be seen when your moulding is put in place. We used 1"x2" pieces, cut at 7" long with 45° angles at each end. 

It is best to put these braces toward the front of your frame. This will give you something to attach your decorative moulding to when you are at that step. Before you attach your braces, it is a good idea to double check that things are square. If so, go ahead and nail your braces to your box.

Step two

Step three
 After the braces are attached make sure to measure twice and cut your decorative moulding with 45° corners. Secure these in place on the front by nailing into the top, bottom and side boards as well as the braces for added support.

Step four


Once this is complete, fill your nail holes with wood filler and caulk the seams. Give it a light sanding to have the smoothest finish possible, and paint the inside before attaching your frame to the wall. This way whenever the screen is moved or tilted the inside will look finished. 

Using a spade blade or a drill attachment to cut holes in the bottom and top to allow for air circulation.

Steps five, six and seven

You also need to attach a piece of 2"x3" to the wall at the appropriate height to mount your frame. The length should be a little shorter then the top side of your frame. Next use a stud finder and screws long enough to hit the studs and attach securely. Make sure to paint this as well!

To secure the cabinet to the wall, sit it on top of the 2x3 using 1 1/2" screws.

Step eight

Step nine

If you were unable to hide your cords inside the wall you could always drill an extra hole in the bottom of your frame to allow the cords to run through.

All thats left now is to mount your TV. Voila! Congratulations you did it! Now put in a movie, and if you are anything like me, fall asleep because you are tired from a long day's work!


SHARE:

Monday, April 27, 2015

SHIPLAP IN A SEA CAPTAIN'S HOUSE

Our old house came with a few small rooms that we tried our best to put to good use. This little room is right at the back of the bathroom hallway which we refinished a little while back. It was said to be a room where the help would have lived when the house was originally built, which is why there is a staircase leading down into the kitchen.

Built in daybed by the previous owners.
We decided that it would be a great space for the kids to watch Netflix and play video games with their friends. It is also a cozy place for little kids to crash when we have family visiting. Parents can have the guest room to themselves and really get a restful nights sleep.

I wanted the room to feel fresh and bright with minimal amount of surfaces to clean etc. Basically, nothing in here could be costly or too precious. I didn't want to have to worry about the abuse things might suffer from frequent use by teenagers! I'm not sure exactly how the previous owners used this room but here is another picture of the room when we were first looking at the house.

Over to the left is the staircase to the attic and to the right is a back staircase down into the kitchen.
 First, we had to make this makeshift bed a little more stable and attractive. To do this, we framed out the bottom of the bed with some 2x4s.  Next, we added some bead board and baseboard to make the bed look more built in with nice trim work.

 I would have loved to have added drawers to the base of the bed however there is a furnace duct under there and we didn't want to interrupt the flow of hot air. This is a nice, toasty room to curl up in.  To help the heat circulate, we added these two simple white grates and put them in the baseboard.


The pillows have been collected over the years and help to make the bed cosy. I plan to sew a few covers to add to the collection. The nesting tables are perfect for snacks, remotes and phones when you are relaxing.


The space is about two inches shorter than a standard twin mattress, so consequently we ordered a custom fit mattress. The cost to do this was surprisingly reasonable and I am pleased with the quality of the mattress, itself.


The mattress has a custom slipcover made from a striped ticking fabric from Ikea. It has held up to several washes and lots of messy kids. Unlike a lot of other slipcovers, I have in the house, it does need to be ironed after you wash it, so I try to avoid that as much as possible.

Paul and I have created many different types of millwork throughout the house. In here we decided to try to mimic the look of shiplap. We thought it was fitting for a house built by a Sea Captain!  We did this by adding 6" strips of plywood. It was a simple, inexpensive installation, and I love the results.


View from the hallway.
To finish things off, we added crown at the top which is totally Paul's department. I'm just a set of extra hands when it comes to measuring and cutting crown moulding. I had reno's in mind when I decided to marry a math major. I have always loved old homes and knew my philosophy degree would not hold up to the rigors of installing crown moulding!


There was a lot of painting in order. Many coats of paint on the trim work and two coats of primer plus two coats of paint on the walls. Ugh ... not fun at all when the sun is finally shining. On the bright side, I didn't have to do the ceiling and, because there were two of use working on this project, I was able to fill the nail holes and caulk as we went along, which made the painting process a little more bearable.

I replaced the old roller blind with a wooden blind from Sears. While I love the look of woven matchstick blinds, which I have used throughout the house, I understood when the kids requested a blind that would really block out the sun when they were trying to watch TV in here. Function over form sometimes! We also replaced all the door hardware, including the hinges, as well as the light fixture. I have used these schoolhouse light fixtures in many places throughout the house because I am enamored with their simple charm.  For the door entering the room I purchased a brass plated knob and back plate. I primed and spray painted them black and they look great.

Same angle as the "before" photo above. To the left is the attic door and the right is a back staircase to the kitchen.


We hung the TV on the opposite wall. It doesn't line up for perfect viewing from the daybed so we put it on a wall mount that can be easily maneuvered and pointed towards the bed.

Sometimes Liev just likes to sit on a pouf on the floor and play video games, so the kids can maneuver it however they like. I am so pleased with the decision to frame it and I am very pleased with the end result. I bought the materials and drew a sketch, but the building was all Paul. It looks great and truthfully it turned out even better than I thought.


The cabinet under the TV was something I bought years ago. It's great for storing gaming systems, movies and video games. There is a permanent HDMI cable running through the wall from the the TV to a hole in the bottom of the console. It is great to have all the cords hidden.

I realize it is very white in here now, not much happening on the walls. I already have some homemade art for in here that is currently being framed. I cannot wait to hang it over the bed.

I plan to follow up this post with more detailed instructions and pictures, if you are interested in attempting any of these projects in your own home.

Thank you for reading along,
Valerie

Sources:
  • paint on trim - Benjamin Moore Delicate White in semi gloss
  • paint on walls - Benjamin Moore Delicate White in velvet
  • blind - Home Depot
  • mattress custom order - Home Hardware Furniture Store
  • cabinet - Sears
  • linen boxes in cabinets - Bed Bath & Beyond
  • natural paper movie boxes - Michaels
  • nesting tables - HomeSense
  • red floor pouf - Target
  • wicker pouf - Wicker Emporium
  • blanket on bed - HomeSense
  • pillows from Target, HomeSense, Ikea & custom
  • door hardware (knobs, plates, hinges, handles and locks) - Kent
  • white jug - Ikea
  • ticking fabric for mattress cover - Ikea
  • light fixture - Kent
  • white tray on bed - HomeSense
  • paper mach moose - TJ Maxx
  • basket holding gaming guitars - HomeSense
  • basket tray on cabinet - HomeSense
  • ginger jars - HomeSense
  • lacquered boxes- Homesense 
  • glass cloche -Michaels
  • lamp -Ikea
  • tassel -Michaels
  • red and white box- Target
  • basket holding gaming guitars- Homesense
  • door stop sprayed black- HomeSense

SHARE:

Friday, April 17, 2015

EVERYDAY GOODNESS

Again this week I thought I would share with you some, pretty, interesting and inspiring things from around the internet or things that have just been on my mind. Enjoy!

They are gorgeous on the inside too! Just like Mindy!

Paul gave me these MINDY KALING CARDS in my Easter basket. I love them! Having read her books and being obsessed with her show, I needed a Mindy fix, and I got one.  In case you were wondering her show airs Tuesday nights on Fox. Right now is on hiatus but if you are in need of a good binge watch the first two seasons are on Netflix.

I brought these cards to last weekends girls sleepover in case we ran out of things to talk about but there were no conversation starters necessary. Everyone at the gathering is a Flibbergiblet. (Mindy code for likes to talk a lot!)


Doesn't the cover give you the heebeegeebees!


Paul also gave me BOSSYPANTS. (really me?)  I am choosing to take that as a sign that he would rather I wake him up late at night with fits of laughter then sobbing. I have been known to do both.

I am encouraging my daughter to read it over the summer because during the school year she tells me she cannot read for pleasure. It is a great book for women of all ages but I am trying to get to her now. She is 18. Far too old for me to keep reciting the message from The Paper Bag Princess. I hope it doesn't take her until she is $! like me, (figure it out) to learn some of life's greatest lessons.


I am still grieving the loss of Target.  I think I am still in the denial, but moving into anger stage. I don't want to believe they left us, but I'm mad.  My husband would say that I tried really hard to keep the stores in Canada open.  It simply was not a one woman job.


I love a good gourd lamp!
In my attempts to move on I perused the Walmart website and found these GREAT LAMPS!  Suck it Target!!! (Ok not really. I know while I'm on vacation I'll still visit, even though I'm mad at you because sometimes, you are that good!) What can I say my love affair runs deep.


I have a thing for scallops. When Jennifer at RAMBLING RENOVATORS blogged about them this week I was thrilled! Someone else appreciated them. You see, I too love scallops!I have sewn them onto table cloths and right now have them in countless places throughout my home from cake plates to these euro shams.


Then to top the week SARAH DIY'D these curtains. I am going to have to copy that DIY at some point some where. Aren't they fabulous!


Lastly JESSICA KANE is doing amazing things and inspiring people everywhere! She remind
us that wearing a swimsuit at the beach isn't an act of bravery.  GO JESSICA!!!


TGIF
Valerie

P.S.   I gave my hubby three dark chocolate bars from the supermarket... I told you my boys are good gift getters!
SHARE:

Wednesday, April 15, 2015

CUSTOM BULLETIN BOARD

 Sorry I am not quite ready to reveal my sneak peak from last week yet. I was majorly distracted these last few days by a thing that has been rare in these parts of late, the sun. I hope you have been enjoying it wherever you are! It's recent appearance here has caused me to put down my paintbrush. In the meantime, I have a little DIY to show you.

  For Christmas last year my son, Liev, gave me a box of lovely KATE SPADE push pins to use in my office. It was so thoughtful and generous of him. Even though I am fairly certain he would not understand why I would love these somewhat costly thumb tacks, he saw them and knew they were something I would love. He also gave me a few other Kate Spade desk items and I love them even more because they were from him. His surprise as to the cost for a thirteen year old is understandable. It's kind of how I feel about the cost of video games, hockey sticks, scooter parts and other costly things he enjoys!

Aren't they lovely!
While I was delighted in receiving these, when I opened the box to use them I quickly realized that their stem was longer than the average push pin. They did not function very well in the bulletin board I had at the time. 

What's a Mom to do when her favorite and only son gives her something so fabulous?  Make a custom bulletin board, of course! I did not do this in a timely fashion, however. Quite a few more holidays passed before I got around to it but, late in the summer, I finally made my bulletin board. Here are some basic instructions, you could adapt to your own custom size, and some not so great pictures from my iPhone. 

SUPPLIES:

  • Plywood or MDF cut to your custom size. Building supply stores will usually do this for you no problem. Mine is 1/2" cut to 40" x 18"
  • Fabric 
  • Quilt batting
  • Ribbon 
  • Scissors
  • Pins
  • Hot glue gun
  • Staple gun
  • Measuring tape
  • Ruler
  • Lighter
  • Pins
  • Cork board - I bought mine in squares from the dollar store at about $1.00 a piece!
  • Picture hangers
To start, I generously applied hot glue to the wood and secured the first layer of cork squares. I then repeated this step, doubling up on the depth of the cork, to accommodate the deep stem on my push pins. When doing this I offset the seams in the cork squares so as to not have any seems or spaces showing. Doubling up might not be necessary if you are using other types of pins.


Next I covered the cork side of the board in one layer of quilt batting, stapling it on the back. This helped to create a nice smooth surface to staple the fabric over.

Prepare your fabric to wrap by cutting it about three inches larger on all sides then your board. Be careful not to cut it too close. It's nice to have enough to really pull on, in order to keep things smooth. You can always cut off the excess once you are done.

To cover it smoothly, the method I use for any upholstering job, is to start in the middle on all sides and working toward the corners. I make small hospital corners on the ends to keep the fabric from puckering. It was pretty straightforward in this case because I didn't have a pattern on the fabric to align. If you have a patterned fabric you might want to be a little more fussy in order to make sure the print lines up.


You might call this project complete right here but I had to add some kind of decorative element to this board. Because my previous board had upholstery tacks around the edge, this time I decided to use ribbon. A simple 3/8" white grosgrain is what I chose and this design isn't difficult once you figure out the size you would like. 

I chose to cut the two longest pieces to be two inches shorter then the width of my board. I centered and pinned it to have an inch on each side and 3 inches up from the bottom.  Next I cut 8 pieces of ribbon at 2.75 inches and seared each end of the ribbon with the lighter to keep it from fraying. Pin them into place using your ruler and pins to keep them aligned. 


Finally, measure and cut the long side pieces and pin into place creating your square corners. 


Once everything was pinned and secured, I carefully used fabric glue to secure the ribbon in place. I'm sure your glue gun would be fine but I had the fabric glue on hand and found it easy to control on the end of a Q-tip. Finally attach some picture hangers to the back and hang!

Okay so that was very long and detailed post about something thats a pretty basic DIY!

Here is a picture of it in use in my office! 


Thanks Liev for my Christmas present last year. I am one lucky gal because this past Christmas he gifted me with something I love as well. My boy is one thoughtful gift giver, his father has taught him well!

I hope to be back by the end of the week with a new post about the kids room and a shiplap tutorial, unless I get distracted by the sun again. If that's the case it might be Monday.


SHARE:

Friday, April 10, 2015

EVERYDAY GOODNESS

Isn't the internet an amazing place! There are really some inspiring and funny things to read, as well as beautiful images to digest.  I thought from time to time I might post some things from around the web that I love and inspire me.


I'm all about learning how to lengthen the longevity of my flowers. I took Emily's advice with my Easter hydrangeas and so far so good!

----------------------------------------------

I think this has been the most snow I have ever seen in Nova Scotia, at least in the sixteen years I have lived here. I'm really, really looking forward to the snow melting. I need to get out of boots and coats. This simple dress is perfect for spring and early summer.


----------------------------------------------

I love to shop at Chapters Indigo for home and gifts. Their new spring line is in and I'm smitten with these sweet glasses and these granny chic pillows.

----------------------------------------------

I have hit repeat on this song ever since I saw Boyhood last year. Paul and Lillie are working on a cover. I hope maybe she lets me record them sometime.


----------------------------------------------

This long winter has allowed me to get back into a reading kick. The weather has made th guilt I feel about my inability to put down a good book, that much easier.  Of all the books snowmaggeden has allowed me to read this winter, this one was by far my favorite. It wasn't just the artwork on the cover but also the Jonathan Franzen review that made me pick it up. I love everything I've read by him as well, just in case you end up reading this and are looking for a good book.


----------------------------------------------

I am also really loving Centsational Girls round up of kitchen light fixtures. I think I might try to do the same that is easily accessible for Canadians.
----------------------------------------------

I really enjoy Sarah Richardson and most anything she does. Set your DVR's because her new show has started on HGTV on Thursday nights in Canada. 


----------------------------------------------

Finally here is a sneak peak at what I'm currently working on.


 I hope to have a post for you early next week. 

Cheers to a great weekend. I am going to an adult, big girl sleepover with friends tonight. Should be lots of fun!


Valerie
SHARE:
© It's a Fancy Schmancy Life. All rights reserved.
Blogger Template Made By pipdig